> ## Documentation Index
> Fetch the complete documentation index at: https://docs-dev-feat-universal-portals.mintlify.site/llms.txt
> Use this file to discover all available pages before exploring further.
# Cas d’utilisation : configurer des étapes d’inscription supplémentaire à l’aide de formulaires
> Apprenez à configurer des étapes d’inscription supplémentaires à l’aide des formulaires d’action.
1. Créez une [application machine-machine](https://auth0.com/docs/get-started/auth0-overview/create-applications/machine-to-machine-apps) avec les permissions suivantes activées :
* `read:users`
* `update:users`
* `create:users`
* `read:users_app_metadata`
* `update:users_app_metadata`
* `create:users_app_metadata`
2. Ajoutez une [Connexion au coffre-fort](/docs/fr-ca/customize/forms/vault) en utilisant les informations d’identification de l’application machine-machine (M-M).
Les formulaires d’actions vous permettent de créer des étapes d’inscription supplémentaires pour vos flux d’inscription et de connexion et les rendre obligatoires pour l’accès des utilisateurs à votre application.
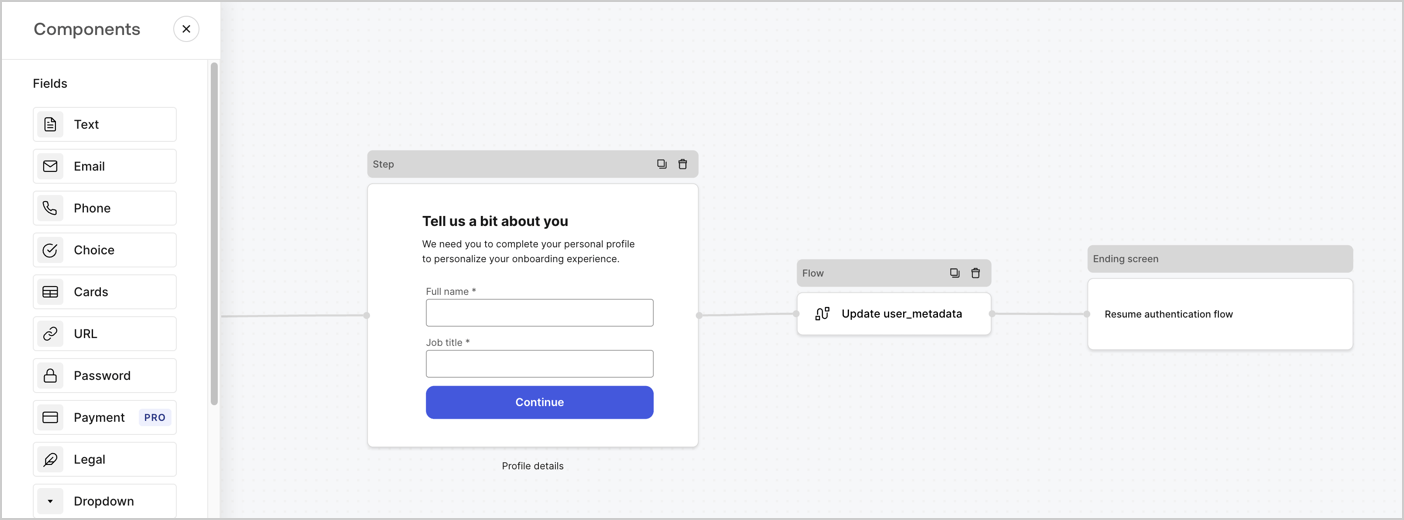 Les sections suivantes expliquent comment créer des formulaires d’étapes d’inscription supplémentaires en utilisant les nœuds et les flux, ainsi que les étapes pour ajouter votre formulaire à une action [Post-connexion](/docs/fr-ca/customize/actions/explore-triggers/signup-and-login-triggers/login-trigger).
## Créer un formulaire à partir de zéro
Suivez ces étapes pour créer un formulaire afin de recueillir des informations :
1. Ouvrez l’éditeur de formulaires en sélectionnant **Auth0 Dashboard (tableau de bord Auth0) > Actions > Forms (formulaires).**
2. Sélectionnez **Créer un formulaire** > **Commencer à partir de zéro**.
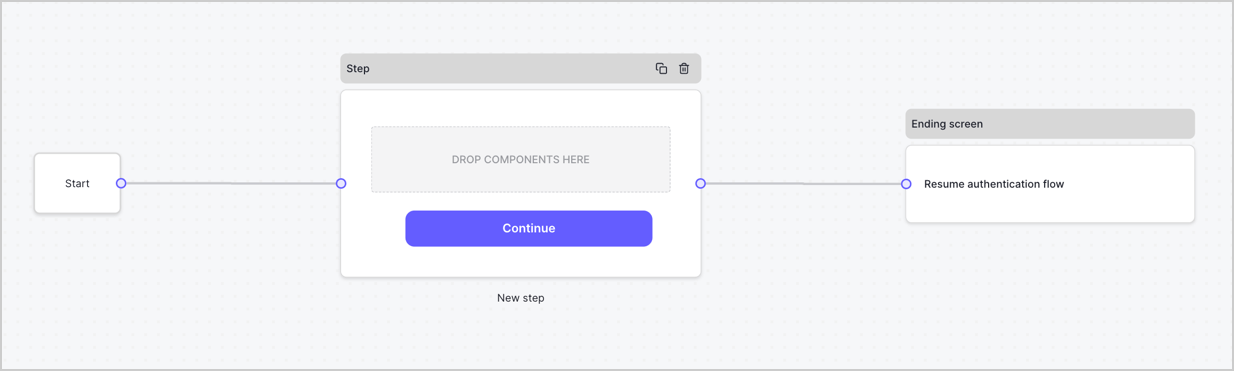
Par défaut, un nouveau formulaire contient un nœud Début, un nœud Étape et un nœud Éran fin.
Les sections suivantes expliquent comment créer des formulaires d’étapes d’inscription supplémentaires en utilisant les nœuds et les flux, ainsi que les étapes pour ajouter votre formulaire à une action [Post-connexion](/docs/fr-ca/customize/actions/explore-triggers/signup-and-login-triggers/login-trigger).
## Créer un formulaire à partir de zéro
Suivez ces étapes pour créer un formulaire afin de recueillir des informations :
1. Ouvrez l’éditeur de formulaires en sélectionnant **Auth0 Dashboard (tableau de bord Auth0) > Actions > Forms (formulaires).**
2. Sélectionnez **Créer un formulaire** > **Commencer à partir de zéro**.
Par défaut, un nouveau formulaire contient un nœud Début, un nœud Étape et un nœud Éran fin.
 ### Configurer le nœud d’étape
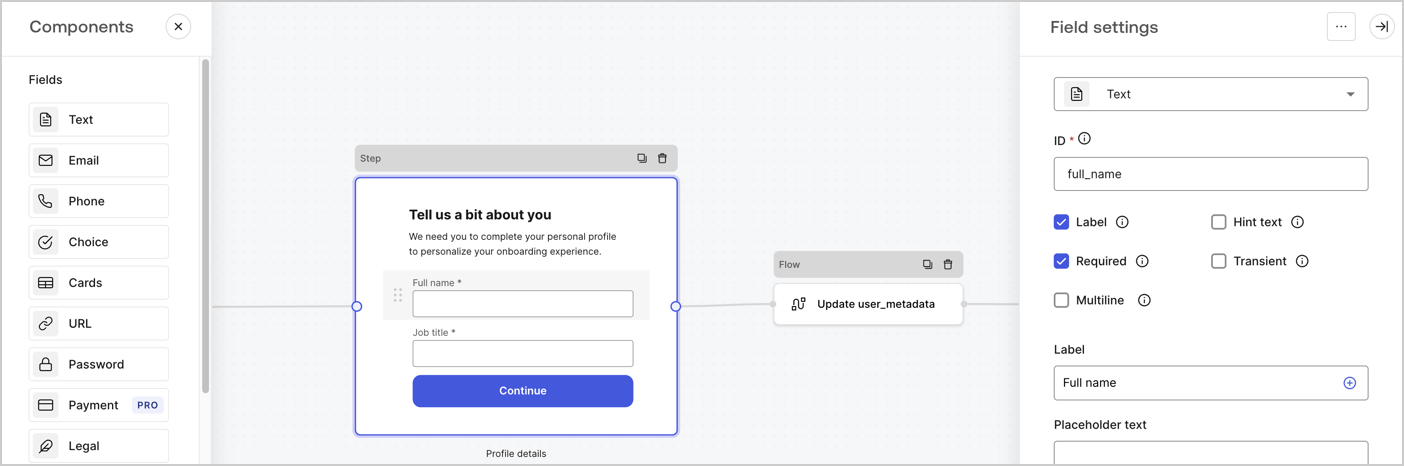
Le nœud d’étape est l’interface graphique présentée aux utilisateurs. Ajoutez des [champs](/docs/fr-ca/customize/forms/nodes-and-components) au nœud d’étape pour collecter le nom complet de l’utilisateur et les valeurs d’intitulé de son poste en procédant comme suit :
1. Faites glisser un champ **Rich text (Texte enrichi)** depuis le **Components menu (Menu composants)** dans le nœud **d’étape**.
* **Rich text (Texte enrichi)** : saisissez un message personnalisé.
* Sélectionnez **Save (Enregistrer)**.
2. Faites glisser un champ **Text (Texte)** dans le nœud **Step (Étape)**.
* **ID** : saisissez `full_name`.
* **Label (Étiquette)** : saisissez `Full name`.
* **Label (Étiquette)** : activez la case à cocher.
* **Required (Requis)** : activez la case à cocher.
* Sélectionnez **Save (Enregistrer)**.
3. Faites glisser un champ **Text (Texte)** dans le nœud **Step (Étape)**.
* **ID** : saisissez `job_title`.
* **Label (Étiquette)** : saisissez `Job title`.
* **Label (Étiquette)** : activez la case à cocher.
* **Required (Requis)** : activez la case à cocher.
* Sélectionnez **Save (Enregistrer)**.
4. Sélectionnez **Publish (Publier)** pour enregistrer.
### Configurer le nœud d’étape
Le nœud d’étape est l’interface graphique présentée aux utilisateurs. Ajoutez des [champs](/docs/fr-ca/customize/forms/nodes-and-components) au nœud d’étape pour collecter le nom complet de l’utilisateur et les valeurs d’intitulé de son poste en procédant comme suit :
1. Faites glisser un champ **Rich text (Texte enrichi)** depuis le **Components menu (Menu composants)** dans le nœud **d’étape**.
* **Rich text (Texte enrichi)** : saisissez un message personnalisé.
* Sélectionnez **Save (Enregistrer)**.
2. Faites glisser un champ **Text (Texte)** dans le nœud **Step (Étape)**.
* **ID** : saisissez `full_name`.
* **Label (Étiquette)** : saisissez `Full name`.
* **Label (Étiquette)** : activez la case à cocher.
* **Required (Requis)** : activez la case à cocher.
* Sélectionnez **Save (Enregistrer)**.
3. Faites glisser un champ **Text (Texte)** dans le nœud **Step (Étape)**.
* **ID** : saisissez `job_title`.
* **Label (Étiquette)** : saisissez `Job title`.
* **Label (Étiquette)** : activez la case à cocher.
* **Required (Requis)** : activez la case à cocher.
* Sélectionnez **Save (Enregistrer)**.
4. Sélectionnez **Publish (Publier)** pour enregistrer.
 ### Configurer le nœud Flow (Flux)
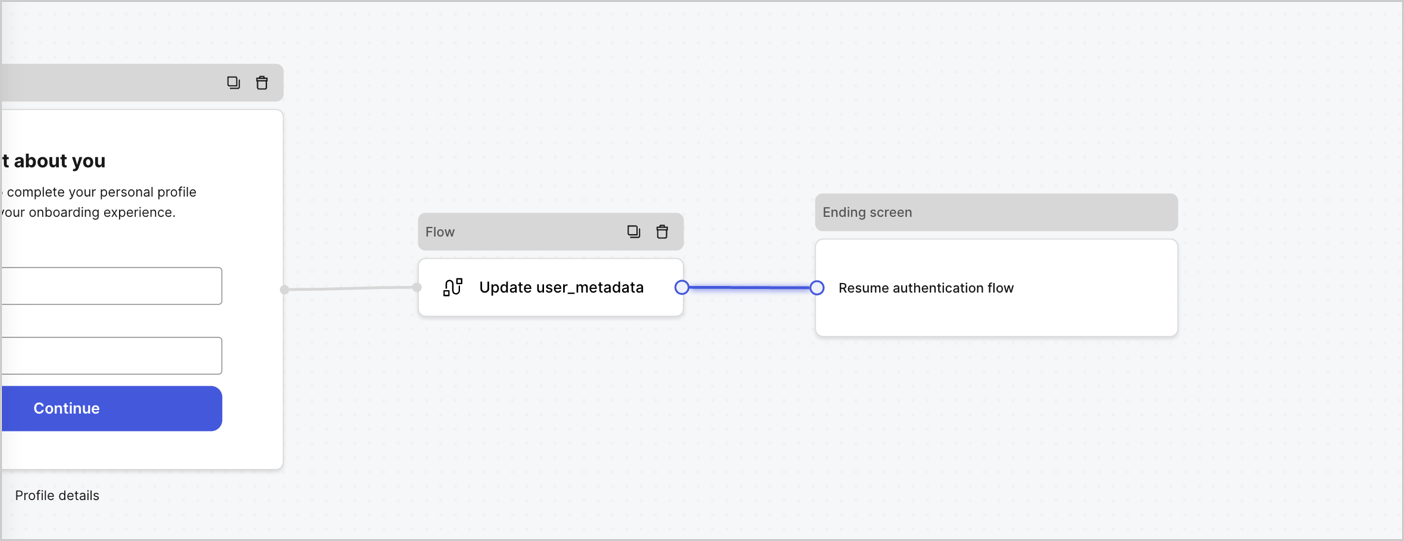
Ajoutez un nœud **Flow (Flux)** après le nœud **Step (Étape)** pour mettre à jour les `user_metadata` et reprenez le flux d’authentification en procédant comme suit :
1. Sélectionnez **Flow (Flux)** en bas de Form Editor (Éditeur de formulaire).
2. Supprimez le lien existant entre les nœuds **Step (Étape)** et **Ending Screen (Écran de fin)**.
3. Sélectionnez le nouveau **Flow (Flux)** > **Click to add a flow (Cliquer pour ajouter un flux)** > **Create a new flow (Créer un nouveau flux).**
* Saisissez `Update user_metadata (Mettre à jour user_metadata)` dans le champ **Name (Nom)**.
* Sélectionnez **Create (Créer)**.
* Sélectionnez **Save (Enregistrer)**.
4. Liez le nœud **Flow (Flux)** aux nœuds **Step (Étape)** et **Ending Screen (Écran de fin)** comme illustré ci-dessous.
5. Sélectionnez **Publish (Publier)** pour enregistrer.
### Configurer le nœud Flow (Flux)
Ajoutez un nœud **Flow (Flux)** après le nœud **Step (Étape)** pour mettre à jour les `user_metadata` et reprenez le flux d’authentification en procédant comme suit :
1. Sélectionnez **Flow (Flux)** en bas de Form Editor (Éditeur de formulaire).
2. Supprimez le lien existant entre les nœuds **Step (Étape)** et **Ending Screen (Écran de fin)**.
3. Sélectionnez le nouveau **Flow (Flux)** > **Click to add a flow (Cliquer pour ajouter un flux)** > **Create a new flow (Créer un nouveau flux).**
* Saisissez `Update user_metadata (Mettre à jour user_metadata)` dans le champ **Name (Nom)**.
* Sélectionnez **Create (Créer)**.
* Sélectionnez **Save (Enregistrer)**.
4. Liez le nœud **Flow (Flux)** aux nœuds **Step (Étape)** et **Ending Screen (Écran de fin)** comme illustré ci-dessous.
5. Sélectionnez **Publish (Publier)** pour enregistrer.
 Ajoutez une action de mise à jour d’utilisateur Auth0 au flux en suivant ces étapes :
1. Sélectionnez le **fluxUpdate user\_metadata (Mise à jour user\_metadata)** > **flux Edit (Modifier)** pour ouvrir l’éditeur de flux dans un nouvel onglet.
2. Sous l’action **Start (Démarrage)**, sélectionnez l’icône **+** pour ajouter une action **Update user (Mettre à jour l’utilisateur)**. Remplissez les champs ci-dessous, puis sélectionnez **Save (Enregistrer)** pour continuer.
* **Connection** : dans la liste déroulante, sélectionnez la connexion au coffre-fort de votre application de communication entre machines.
* **User ID** (ID utilisateur) : Saisissez `{{context.user.user_id}}`.
* **Body (Corps)** : copiez et collez le code suivant pour mettre à jour les métadonnées utilisateur avec les propriétés `full_name` et `job_title`.
```
{
"user_metadata": {
"full_name": "{{fields.full_name}}",
"job_title": "{{fields.job_title}}"
}
}
```
* Sélectionnez **Save (Enregistrer)**.
3. Sélectionnez Publish (Publier) pour enregistrer.
## Récupérer votre code de rendu
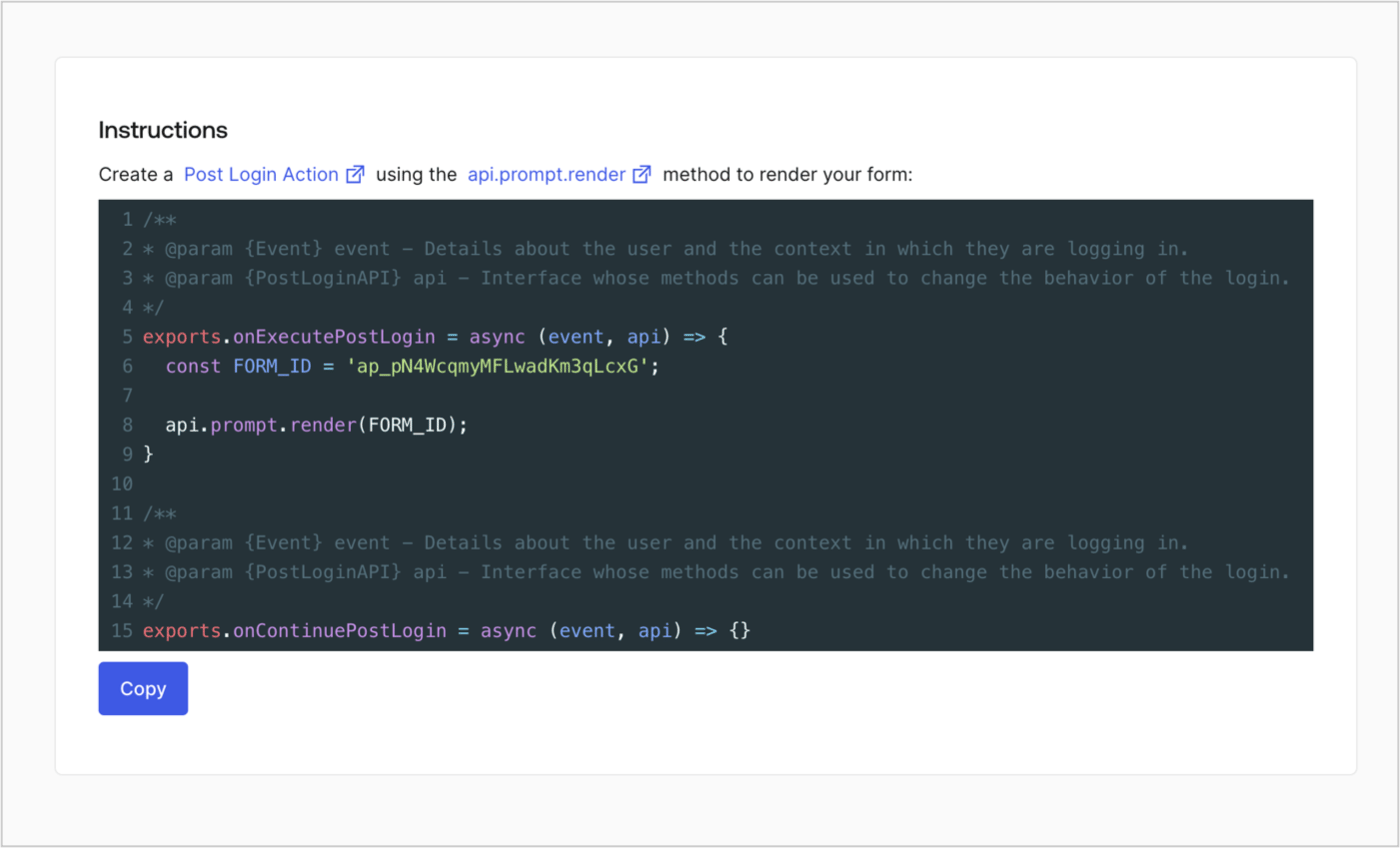
Récupérez votre code de rendu pour afficher visuellement le formulaire avec une action de post-connexion personnalisée en suivant ces étapes :
* Dans l’éditeur de formulaires, sélectionnez **\<> Render (Rendre)**.
* Sélectionnez **Copy (Copier)**.
Ajoutez une action de mise à jour d’utilisateur Auth0 au flux en suivant ces étapes :
1. Sélectionnez le **fluxUpdate user\_metadata (Mise à jour user\_metadata)** > **flux Edit (Modifier)** pour ouvrir l’éditeur de flux dans un nouvel onglet.
2. Sous l’action **Start (Démarrage)**, sélectionnez l’icône **+** pour ajouter une action **Update user (Mettre à jour l’utilisateur)**. Remplissez les champs ci-dessous, puis sélectionnez **Save (Enregistrer)** pour continuer.
* **Connection** : dans la liste déroulante, sélectionnez la connexion au coffre-fort de votre application de communication entre machines.
* **User ID** (ID utilisateur) : Saisissez `{{context.user.user_id}}`.
* **Body (Corps)** : copiez et collez le code suivant pour mettre à jour les métadonnées utilisateur avec les propriétés `full_name` et `job_title`.
```
{
"user_metadata": {
"full_name": "{{fields.full_name}}",
"job_title": "{{fields.job_title}}"
}
}
```
* Sélectionnez **Save (Enregistrer)**.
3. Sélectionnez Publish (Publier) pour enregistrer.
## Récupérer votre code de rendu
Récupérez votre code de rendu pour afficher visuellement le formulaire avec une action de post-connexion personnalisée en suivant ces étapes :
* Dans l’éditeur de formulaires, sélectionnez **\<> Render (Rendre)**.
* Sélectionnez **Copy (Copier)**.
 ## Créer une action post-connexion
Créez une action post-connexion pour afficher votre formulaire en suivant ces étapes :
1. Naviguez vers **Auth0 Dashboard > Actions > Flows (Flux) > Login (Connexion).**
2. Sélectionnez l’icône **+**, puis **Build from scratch (Créer de A à Z)** :
* **Name (Nom)** : saisissez `Render Additional Signup Form`.
* **Trigger (Déclencheur)** : sélectionnez `Login / Post Login`.
* **Runtime (Temps d’exécution)** : sélectionnez la version recommandée.
3. Sélectionnez **Create (Créer)**.
Pour configurer l’action post-connexion.
1. Supprimez le code existant dans l’éditeur de code.
2. Collez le code de rendu du formulaire dans l’éditeur de code.
3. Modifiez le code pour définir la logique conditionnelle d’affichage du formulaire.
```javascript lines theme={null}
/**
* @param {Event} event - Details about the user and the context in which they are logging in.
* @param {PostLoginAPI} api - Interface whose methods can be used to change the behavior of the login.
*/
exports.onExecutePostLogin = async (event, api) => {
const FORM_ID = 'REPLACE_WITH_YOUR_FORM_ID';
if (
!event.user.user_metadata.full_name &&
!event.user.user_metadata.job_title
) {
api.prompt.render(FORM_ID);
}
}
exports.onContinuePostLogin = async (event, api) => { }
```
L’exemple de code ci-dessus affiche le formulaire lorsque les propriétés full\_name et job\_title des métadonnées de l’utilisateur sont manquantes.
4. Sélectionnez **Deploy (Déployer)**.
5. Glissez-déposez l’action **Render Additional Signup Form (Rendre le formulaire d’inscription supplémentaire)** dans le flux **Login (Connexion)**.
## Créer une action post-connexion
Créez une action post-connexion pour afficher votre formulaire en suivant ces étapes :
1. Naviguez vers **Auth0 Dashboard > Actions > Flows (Flux) > Login (Connexion).**
2. Sélectionnez l’icône **+**, puis **Build from scratch (Créer de A à Z)** :
* **Name (Nom)** : saisissez `Render Additional Signup Form`.
* **Trigger (Déclencheur)** : sélectionnez `Login / Post Login`.
* **Runtime (Temps d’exécution)** : sélectionnez la version recommandée.
3. Sélectionnez **Create (Créer)**.
Pour configurer l’action post-connexion.
1. Supprimez le code existant dans l’éditeur de code.
2. Collez le code de rendu du formulaire dans l’éditeur de code.
3. Modifiez le code pour définir la logique conditionnelle d’affichage du formulaire.
```javascript lines theme={null}
/**
* @param {Event} event - Details about the user and the context in which they are logging in.
* @param {PostLoginAPI} api - Interface whose methods can be used to change the behavior of the login.
*/
exports.onExecutePostLogin = async (event, api) => {
const FORM_ID = 'REPLACE_WITH_YOUR_FORM_ID';
if (
!event.user.user_metadata.full_name &&
!event.user.user_metadata.job_title
) {
api.prompt.render(FORM_ID);
}
}
exports.onContinuePostLogin = async (event, api) => { }
```
L’exemple de code ci-dessus affiche le formulaire lorsque les propriétés full\_name et job\_title des métadonnées de l’utilisateur sont manquantes.
4. Sélectionnez **Deploy (Déployer)**.
5. Glissez-déposez l’action **Render Additional Signup Form (Rendre le formulaire d’inscription supplémentaire)** dans le flux **Login (Connexion)**.
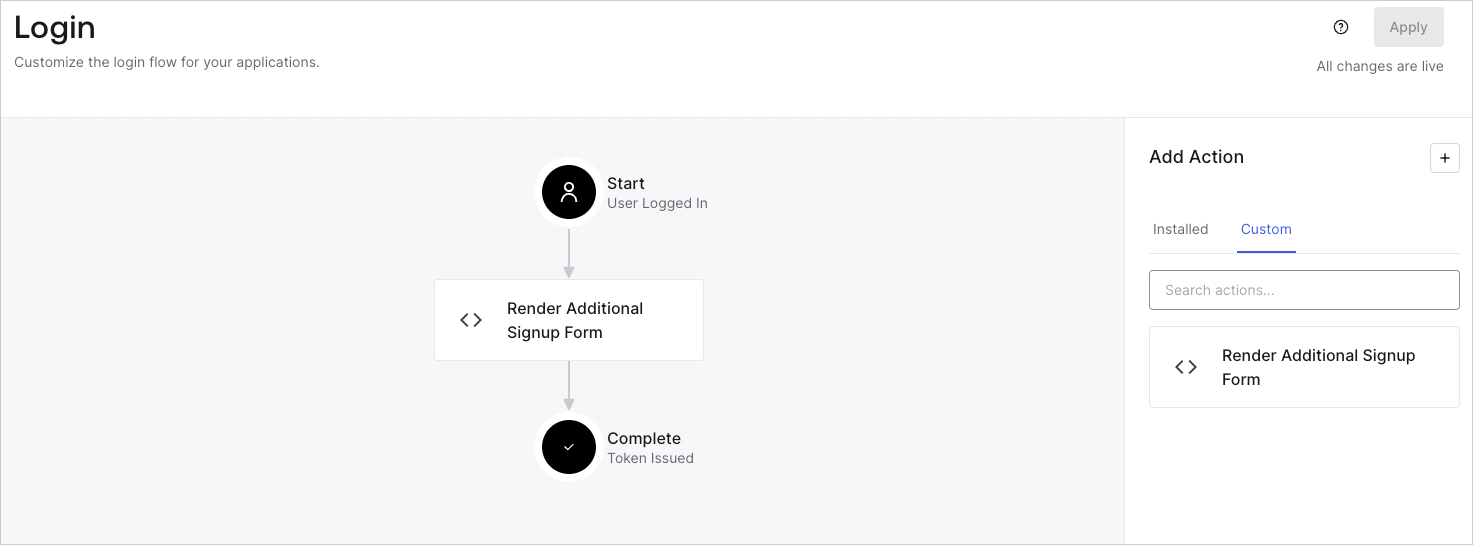 6. Sélectionnez **Apply (Appliquer)**.
### Tester la mise en œuvre
Testez la mise en œuvre en procédant comme suit :
* Inscrivez-vous à une application en tant que nouvel utilisateur.
* L’action post-connexion dans le flux de connexion affichera le formulaire et demandera des informations.
* Sélectionnez **Auth0 Dashboard > User Management (Gestion des utilisateurs)> Users (Utilisateurs)**, localisez le nouvel utilisateur et vérifiez que ses attributs `full_name` et `job_title` contiennent les informations de l’étape d’inscription supplémentaire.
6. Sélectionnez **Apply (Appliquer)**.
### Tester la mise en œuvre
Testez la mise en œuvre en procédant comme suit :
* Inscrivez-vous à une application en tant que nouvel utilisateur.
* L’action post-connexion dans le flux de connexion affichera le formulaire et demandera des informations.
* Sélectionnez **Auth0 Dashboard > User Management (Gestion des utilisateurs)> Users (Utilisateurs)**, localisez le nouvel utilisateur et vérifiez que ses attributs `full_name` et `job_title` contiennent les informations de l’étape d’inscription supplémentaire.